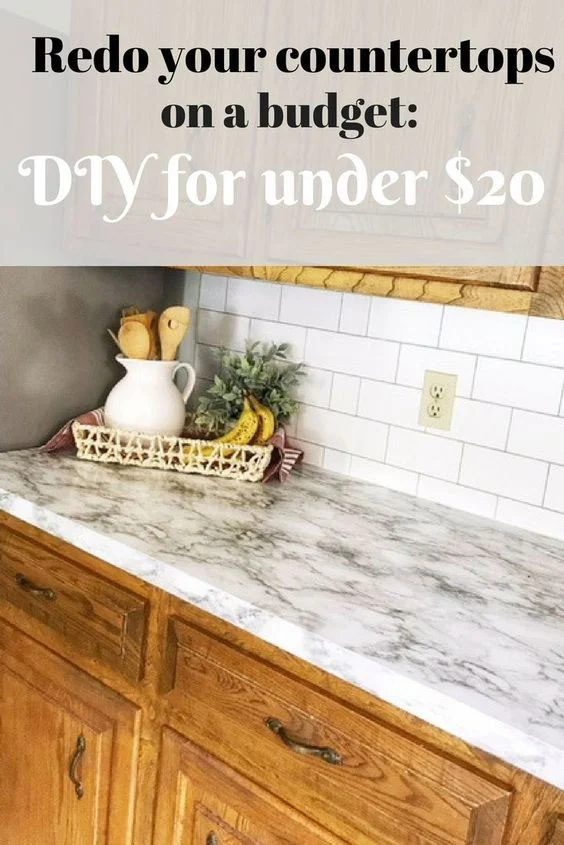
Do you hate your backsplash? Is it an ugly color? Maybe the grout is all discolored and stained. Perhaps you don’t even have one.
Do you want to replace it, but don’t want to spend the time or money on it?
I’ve got the solution for you.
Here is the #1 DIY Backsplash idea. The best part…it is peel and sticks!!
This solution is perfect for house flippers, renters, renovators, or those just wanting a quick update without breaking the bank.
We completed this project in an afternoon for around $30!!!
The new home we just bought needs a desperate kitchen makeover. I don’t want to dump the big bucks into it right now. But ultimately I needed a solution. I couldn’t stand to look at the yellow countertop and backsplash any longer. It was just making me sad. The kitchen felt stale and unhappy.
I thought about ripping it out and replacing it with a lighter color laminate, and then I changed my mind. Why would I make that mess and spend that money to have to do it all over again for the real deal renovation in a couple of years?
Then I thought about painting it. I feel like I’m such a good painter, but my husband will quickly disagree. I decided against that too because I probably would have just made a huge mess. It would’ve looked terrible, and then I would have had to rip it all out. Creating the lot and money sinkhole I can’t deal with right now.
But I wasn’t ready to give up yet. I did some research and came across this wallpaper. I’m sure you’ve seen it around. Wallpaper is back!!!!! I’m not ready to cover a wall in it just yet, but I think it works great for a backsplash.
After I transformed my countertops using contact paper, I was ready to tackle the backsplash.
If you missed my countertop transformation, you would want to check it out HERE!!!!
Anyway…back to the backsplash. Keep reading for installation instructions.
I headed over to Target and bought their Divine color line. It’s around $30. A steal of a deal! It comes in a ton of different styles and colors. I chose the subway tile. My other favorites were the shiplap and the brick.
OMG, I get excited about the opportunities! I’m thinking about a bookshelf…that’s a post for another day
Supplies:
• Roll of the wallpaper of your choosing
• Scissors
• Razor blade
• Straight edge
• Windex(optional)
Directions:
1. Start at the edge of your backsplash and roll out the wallpaper until you get to a stopping point.(like a corner)
2. Draw a line with your straight edge and then cut the wallpaper to size using your scissors.
3. Spray and rub in Windex on the backsplash before applying the wallpaper.
4. Have one person hold the roll and unravel it while the other person sticks it down and gets the bubbles out.
5. When you reach an outlet, use the razor blade to cut the area around it.
6. You may want to caulk the bottom to give it a finished look.
Ninja Pro Tip #1:
The wallpaper sticks pretty fast and does not move well, like the contact paper did on the countertops. Spraying the Windex gives you a chance to slide and move it to get bubbles out. This is extremely useful for installation.
Ninja Pro TIP #2:
Don’t overlap the wallpaper. It doesn’t like to be overlapped. This causes bubbles, and you can see the seam this way. Seams are bad. They are not pretty.
Are you ready to tackle this project? Just make sure you have a partner. It would be tough to DIY this one by yourself. It is super easy with 2 people, though!
I’m so happy with the finished look of my kitchen. With my new countertops and backsplash, I no longer have the “renovate your kitchen” fever! And I saved a ton of money.
Total cost for countertops and backsplash $50. $50!!!! Can you believe it??? That’s crazy all!
Here are my Backsplash before
Another peel and stick option is the 12 x 12 subway tile sheets. Each box contains 10 12×12 tiles. They may look and feel more like tile than the wallpaper. I don’t have any personal experience with these, but it looks like many people love them. You can purchase this on Amazon or at your local hardware store. It looks as though it may be a little more expensive too.
Don’t limit this great idea to kitchens alone! This works great in bathrooms too!
My kids bathroom upstairs is next on my list. With young kids I’m not about to dump major money on a bathroom renovation that they will run within some time. This offers the perfect solution to my problems! It will look pretty and serve a purpose! It is durable enough to withstand my little monsters! That’s a win in my book!
It’s quick, easy, and budget friendly. What more can you ask for?
I can’t remember the last time I completed a total transformation like this for anywhere close to that price. It is one of those things that look to good to be true. But it isn't!!! My only regret is that I didn’t know about it sooner. What are you waiting for? Get out there and start DIYing!
Have you ever used wallpaper for a trick like this? If so I’d love to hear about it! Tell me about it in the comments or send me a picture to admin@homehashtagdecor.com so you can be featured.


No comments:
Post a Comment